ThinkPad T60 - How to Make a Custom OEM Windows CD
Now updated for Windows XP SP3, if you encounter any problems, please let me know!
Please note that the RVM Update Pack and KB896256 hotfix are no longer necessary with Service Pack 3.
When I first bought my Lenovo ThinkPad T60, I was a little disappointed at the absence of a normal OEM Windows XP CD. This CD would allow the user to install their own copy of Windows free of the preloaded garbage that comes on every machine. After reading some posts and tutorials and running into problems, I finally have the solution for ThinkPad T60 owners. The CD that is created in this tutorial embeds the Lenovo OEM key (different from the one on the bottom of the machine) and doesn’t require activation as long as it’s installed on the same machine the license came with.
A lot of the initial inspiration came from this guide, but everything here has been recreated from scratch to customize for T60 owners. This may work on other Lenovo models, but some of the instructions are likely to change slightly (mainly the drivers and hotfix). Anyway, let’s get started.
Update: I tried out the install last night and it seemed to work well. Windows booted up fine the first time and I had only minor problems with System Update not properly installing things. This may or may not have been caused by the slipstreaming, but if anyone is willing to experiment, you can easily leave out the network drivers and update pack (make sure to still use the Intel Storage Matrix Driver).
If you have any suggestions or problems, please post a comment below!
Downloads
- Drivers
- Ethernet (Intel PRO/1000 LAN adapter software) for Windows 2000/XP
- Intel Matrix Storage Manager Driver for Windows 7 (32-bit), Vista (32-bit) and XP (32-bit)
- One of the following wireless drivers (Optional)
- Tools
- Updates
Preparation
- Download all of the necessary files listed above.
- Install nLite using the provided installer package.
- Run the Magic Jelly Bean Keyfinder to retrieve the currently installed CD Key for use later. Write this number key down or save it in a text file.
- Execute the driver packages to extract them. By default the packages should extract to C:\DRIVERS\WIN, but please make sure you know where they are being extracted to.
- Extract the Windows XP CD Package (wxp.zip) to a drive with at least a few gigabytes of free space. The package includes the necessary CD indentification files that aren’t copied on to your hard drive. Note that the package does not include any actual install files, those come from your computer.
- Open the cds folder that you just extracted and then open the wxphome or wxppro folder depending on the version of Windows that came installed on your computer.
- Do not modify or remove any of the files in this folder since it will become the root of your CD. Copy (don’t move) the C:\I386 folder containing the Windows install files into this folder so it becomes a subdirectory (ex. *C:\cds\wxppro\I386*).
- Optionally, the SUPPORT and VALUEADD folders can similarly be copied into this folder since they are part of the original XP CD.
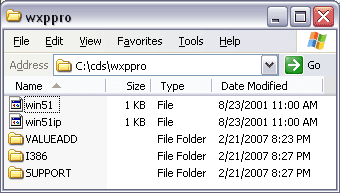
This is what the folder should look like after it has been prepared. In my example I used the wxppro folder since my computer came with Windows XP Pro installed.
Creating the CD
- Start the nLite program and click Next.
-
Click Browse… and browse for your Windows installation folder (either wxphome or wxppro).
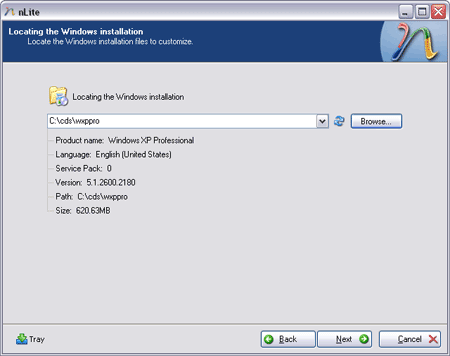
This is what the screen should look like if you correctly located your Windows installation folder. -
Click Next twice to get to the “Task Selection” screen. Select the Service Pack, Hotfixes and Update Packs, Drivers, Unattended, and Bootable ISO tasks and click Next.
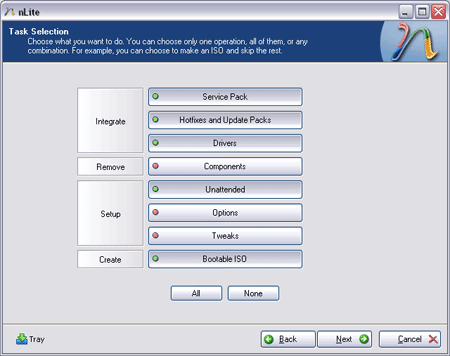
Make sure your Task Selection screen looks like this. - On the “Service Pack” screen, click Select to locate the Service Pack 3 install file. If a message comes up saying that “Previous Hotfixes have been detected,” hit the Yes button to remove them. Once the Browse window comes up, locate the executable for Service Pack 3, it should be called WindowsXP-KB936929-SP3-x86-ENU.exe and click Open. Wait for the slipstream to complete and click the OK button when it says “Integrated install has completed successfully.” Make sure the version is now reported as “Windows XP <Version> Sp3” and click Next.
-
On the “Drivers” screen, click the Insert button and click Single driver. To add the Intel Storage Matrix driver, navigate to the driver folder (usually C:\DRIVERS\WIN\IMSM) and choose the file iaahci.inf. Select “Textmode driver” and only “Intel(R) 82801GBM SATA AHCI Controller (Mobile ICH7M)” and click OK.
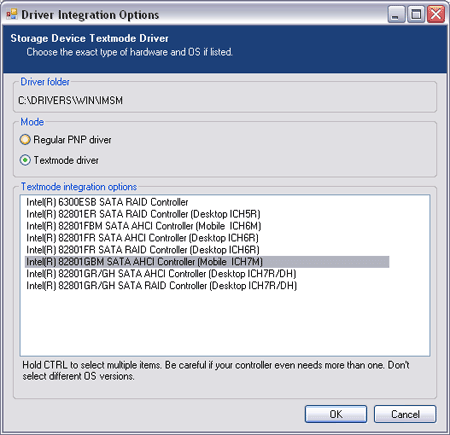
Make sure the selections match before clicking OK. - To add the ethernet driver, click the Insert button and click Single driver. Navigate to the Intel PRO/1000 LAN driver folder (usually C:\DRIVERS\WIN\ETHERNET\PRO1000\WS03XP2K) and choose the file e1e5132.inf.
- Optionally, you can do the same for the wireless driver by going to the correct driver folder (usually C:\DRIVERS\WIN\WLANINT\XP\Drivers for Intel PRO/Wireless) and choosing the correct file (NETw39x5.inf for Intel PRO/Wireless).
-
Once all the drivers are added, click the Next button to continue.
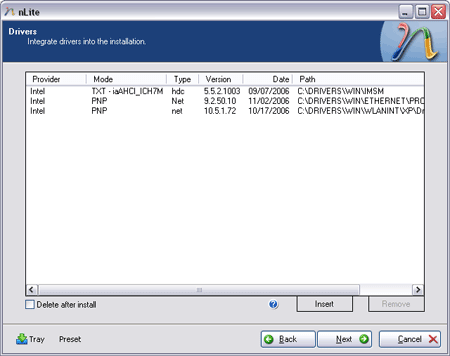
The driver integration screen should look similar to this. -
On the “Unattended” screen, you can modify a large number of options for the installer, but I only recommend filling in the product key.
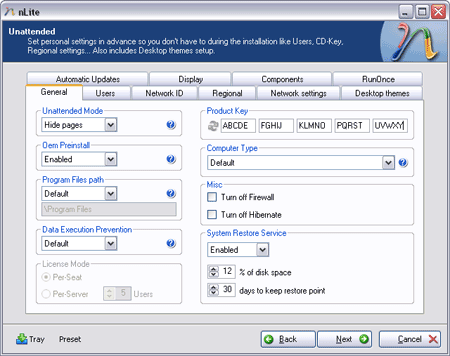
I recommend filling in the product key only and leaving the other options alone. - When you click the Next button, you will be prompted with “Do you want to start the process?” If everything is correct on the previous screens, you should click Yes to make the modifications.
- Once the “Processing…” screen is finished, click the Next button to continue.
-
On the “Bootable ISO” screen, you can choose whether to create an image, burn a CD, or burn an image that you have created previously. I usually create an image to test out on a virtual machine before burning. You can choose any label you want, but I usually use the label “WXPFPP_EN” since it is the label used on all Windows XP Professional CDs I’ve dealt with. Once all of the settings are correct, hit the Make ISO or Burn button. If you chose to create an image, you will be prompted for a location to save it.
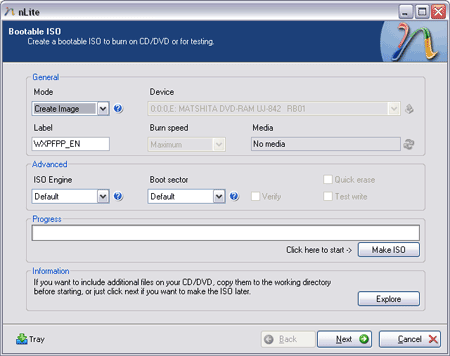
The settings I use to make an ISO for testing in a virtual machine before burning to CD. - Once the burn or image is complete, click the Next button and then the Finish button to exit the program.
- If you chose to make an image earlier, you need to burn it to CD before trying to install on your ThinkPad. One free program I recommend is ImgBurn (and it even works on Vista).
Using the CD
- Before you do anything else, please make sure to backup your important data! It is also highly recommended that you create your recovery discs if you haven’t already and manually back up the Lenovo folders from the C drive. The folders to grab are drivers, I386, SUPPORT, SWSHARE, SWTOOLS, and VALUEADD which should all fit comfortably on a DVD. Some of the installers under SWTOOLS can only be found in this folder and not online.
- Make sure your laptop is set to “AHCI” under “Config”->”SATA” in the BIOS and that you are able to boot from a CD. If it is set to “Compatibility,” there may be problems if you try to switch it to “AHCI” after the install.
- If you want to remove the recovery partition (make sure you created your recovery disks before doing anything), you need to disable the “Predesktop Area” under “Security” in the BIOS.
- Boot with the CD in the drive and you may have to “Press any key to boot from CD…” if the drive already has Windows installed.
- On the partition screen you should be able to delete both partitions (system and recovery) and create one or two custom partitions. I personally use 40GB for C and the rest of my 120GB drive for D and that works well for me, but this is an entirely personal thing.
- The rest of the install should go like normal except that you won’t have to enter a key during the install. All other prompts should be there just as they once were.
- After the install, you should immediately have network access over either ethernet or wireless (if you added the drivers) and should immediately run Windows Update. I wouldn’t bother with the drivers at first, but make sure to get both versions of the .NET Framework (v1.1 and v2.0) so that you can install System Update if desired.
- From here you are basically on your own and more information can be found on Lenovo’s site and at the thinkpads.com Support Community where I usually check in a few times per day.
Notes
- If you use System Update, it might continually say that the Intel Storage Matrix Driver isn’t installed and even after you tell it to install again, it will still keep coming up. This didn’t happen to me when I tried it and can safely be ignored.
- It will most likely be necessary to install the driver package for your wireless card again after the install has completed. At least with my Intel PRO/Wireless 3945, Access Connections wouldn’t work with it until I installed the driver again, even though Windows was able to connect with it just fine. The main reason for integrating the driver is to get wireless immediately so this isn’t a problem for me, but you can always leave it out if this bothers you.
- .NET 3.0 refused to install via Windows Update, but installed just fine when I downloaded the installer from Microsoft. This may be related to the RVM Update Pack, but I’m not sure at this time.
- Some packages don’t show up in System Update 3.0 and others don’t seem to install properly. I don’t believe this is related to the Windows install, but it’s a possibility. It seems that the best way to install Lenovo software is to use the Driver Matrix.
